
The Applicant File is where all the information about a student's application is stored, giving your team a single, structured view of an applicant's details, progress and the actions available. Understanding it will help your team review applications and make decisions efficiently.
General layout
- Breadcrumb trail, a navigation path at the top lets you return to the Admissions Workflow spreadsheet. The applicant's full name is clickable and links back to their Summary page.
- Applicant's name shown prominently at the top for easy reference.
- Right-hand panel a structured overview of key details: personal information (full name, fee status, nationality, date of birth, email, phone) and the action buttons available, which vary depending on the page you're on.
The file for leads vs submitted applications
- Leads (not yet submitted): an Applicant File is created for every applicant who registers and completes the "Your Information" section. Until they submit, the Summary page reflects that the application isn't submitted yet, and the Application and Programmes pages are hidden.
- Submitted applications: once the applicant submits, the full set of pages, actions and details becomes available.
The file brings all applicant data into one place, with the breadcrumb trail and right-hand panel making it easy to navigate and find key details quickly.
The Summary page
The Summary page gives a high-level view of an applicant's status, showing different information depending on whether the application has been submitted.
Before submission
- For an application started by the applicant or an agent, a message shows: "Applicant has not submitted their application yet."
- For an application started by university staff on the applicant's behalf, the page shows the in-progress state with the option to open and complete it (covered in Creating an application on behalf of an applicant).
After submission
- The page displays the applicant's latest academic and English language qualifications.
- An application link takes you straight to the full Application page.
The Summary page gives a clear read on application status and quick access to the key details, with a direct link through to the full application.
The Application page
The Application page is where your team reviews all the data and documents an applicant submitted. It's available only for applicants who have submitted — until then it stays hidden.
Understanding the application tasks
An application is made up of task groups, each containing individual tasks the applicant completed, for example providing personal details, uploading documents (passport, transcripts), or answering course-specific questions. The Application page shows all completed tasks at a glance.
- Where a document has been uploaded, a document badge appears on the task.
- Selecting a task opens a detailed task view, showing the information the applicant provided and any files attached.
Drilling into a specific task
Selecting a task opens a dedicated page for that item, with:
- A task navigation menu in place of the standard left-hand panel.
- A "Back to Application" button to return to the main page.
- A data section showing the applicant's responses.
- A files section, where the task involved uploads.
- Previous and Next buttons to move between tasks without returning to the main page.
All submitted information sits in one place, documents are viewable without downloading or sorting separately, and moving between tasks is quick.
Editing application data
Your team can edit the data an applicant submitted, so the university's record stays accurate and any offers issued reflect the correct, up-to-date information. For example, if an applicant entered their name as "Mod" but their passport shows "Modesta," staff can update the record so all documents and offers use the correct legal name.
Who can edit, and what
- Available to all user roles except View Only.
- Edits are possible on all application tasks (for example Identity, Contact Details, Education History), including personal details such as name, nationality and date of birth.
For data entered at the earlier lead / "Your Information" stage, see Editing other applicant data below.
How to edit
- In the application, select the Edit button shown on each application page or task.
- This opens the same interface the applicant uses, making the data editable.
- Choose Save & return to commit the changes immediately (the updated value replaces the previous one), or Cancel to discard them and return to the read-only view.
What happens when you save
Saved edits apply immediately and are reflected in the:
- Application file (the primary record)
- Spreadsheet view (the summary table)
- Offer letter preview (for new offers or previews — see the important note below)
Transparency and audit
- Original vs latest value: an edited field shows both the original value the applicant submitted and the latest value entered by staff. If a field is edited several times, only the original and the most recent value are shown.
- Activity log: every edit is logged with the time, the user's role, the user's name, and what changed — e.g. "Application data edited: Identity task field Given name updated to Modesta."
Important — issued offer letters are not updated automatically. If you edit data that affects an offer letter (name, programme details, conditions), you must re-issue the offer for the applicant to receive the updated version. This gives staff control over when applicants see changes, and keeps a clear, auditable record.
Editing other applicant data
Beyond the application tasks, your team can edit key applicant details directly from the sidebar, keeping personal and application details accurate across the platform.
How to edit
- Open the applicant record.
- In the sidebar, select Edit (not available to the View Only role).
- A full-page edit screen opens, showing all editable fields.
- Make the changes and save — they take effect immediately.
Editable fields
|
Field |
Notes |
|
Given name |
Cannot be empty; also updates the Identity task |
|
Middle name (optional) |
Syncs with the Identity task |
|
Family name |
Cannot be empty; syncs with the Identity task |
|
Fee status |
Shows a warning when changed |
|
Student visa requirement |
Shown only when fee status is Overseas / Not sure |
|
Highest qualification on entry |
Select from a list |
|
Agent |
Assign or remove an agent |
|
Nationality |
Syncs with the "Nationality & residence" task |
|
Date of birth |
Cannot be today or in the future; applicant must be older than 13 |
|
Email address |
Managed via the email-change process |
|
Mobile number |
Must be a valid phone number |
System behaviour
- Validation: the same rules as the applicant application flow apply, to keep data consistent.
- Activity log: all edits are recorded automatically with timestamp, user and role, the field changed, and the old and new values.
Editing here keeps records accurate, syncs updates across linked tasks (Identity, Nationality), and maintains a full audit trail — reducing the need for manual support fixes.
The Programmes section
The Programmes section of the Applicant File gives a structured view of every programme an applicant has applied to, so your team can see each programme's status at a glance and open any one to take action.
Navigation and structure
- Programmes appears under Application in the left-hand navigation, with a number showing how many programmes the applicant has.
- An edit icon appears against a programme when one of its tasks has been changed but not yet published.
- Each programme is shown in its own section and links through to its programme page.
What it shows
- Every programme the applicant has applied to, each with its status (Applied, Conditional, Unconditional, Completed or Closed), the applicant's response, and indicator icons (New, Accepted, Declined and Edit).
- An Offer a new programme action lets you create a new programme for the applicant.
The section gives a clear overview of every programme linked to an applicant, with statuses, responses and edit indicators surfaced for each.
The Activity Log
The Activity Log provides a complete audit trail of all actions taken on an applicant's file, helping your team track key events with full transparency and accountability.
What it shows
A chronological record of all system actions, user interactions and status updates for an application. A search bar lets you filter entries by keyword or action type, and each entry is shown in a table with:
- Time, timestamp of the action
- Role, the role of the user who performed it
- Actor, the specific user (or the system) that initiated it
- Activity, a description of what happened
What gets logged
The log captures the full lifecycle of an application, including:
- Applicant actions, registration, email verification, application submission, and updates to their programme choices
- Emails, each email sent to the applicant (with the subject line)
- Offer actions, drafting, issuing and re-issuing conditional and unconditional offers, and offers being reinstated
- Requirement actions, adding standard or custom requirements, changing a requirement's status (with any note), and updating condition/reason text
- Programme data changes, updates to details such as start date or fee
- Offer letter text,edits to the offer opening and closing text
- Scholarships, adding or removing a scholarship (with amount and title)
- Outcomes, rejecting or withdrawing an offer (with reason), and stage changes
- Finance, changes to a financial requirement's status (e.g. proof of deposit approved)
- File uploads, files uploaded against a requirement
- Data edits, fee status, student visa status, and any application data edited by staff (with the field and new value)
Each entry records the time, role and actor, giving a clear, searchable history of how an application has progressed — supporting compliance and accountability.
The programme page
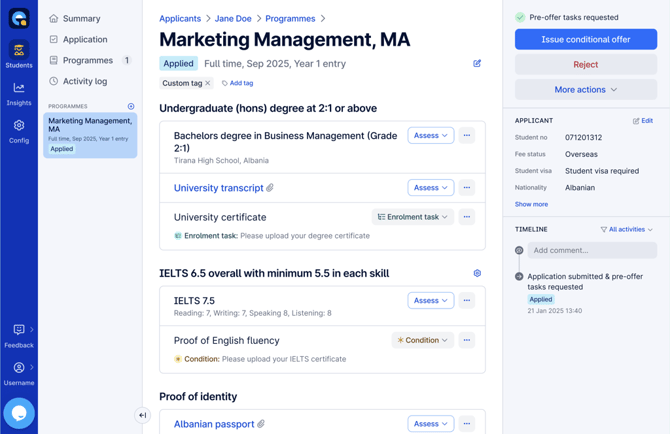
The programme page is where your team views and manages an individual programme: its requirements, its status, and the offer.
What a programme is
A programme is a combination of Course + Intake + Mode + Campus + Entry Year. An applicant can apply to several programmes; each is created with the status Applied.
Programme statuses
|
Status |
When it applies |
|
Applied |
On submission. Any configured pre-offer tasks are published to the applicant automatically; staff can publish further pre-offer tasks. The programme stays Applied until an offer is issued or it's closed. |
|
Conditional |
A conditional offer has been issued. |
|
Unconditional |
An unconditional offer has been issued. |
|
Completed |
Unconditional, the applicant has accepted, finance tasks are approved, and all enrolment tasks are satisfied or exempt. |
|
Closed |
The application has been rejected, or a previously issued offer withdrawn. |
The right-hand panel and primary action
The primary action button is the single control for publishing tasks and issuing offers — it changes to reflect the programme's current state and the most recent task edit:
- Applied: Issue conditional offer (no pre-offer tasks, or already published) · Publish pre-offer tasks (a pre-offer task has been added or re-requested).
- Conditional: Re-issue conditional offer (conditions edited/added/re-requested and not all satisfied) · Issue unconditional offer (all conditions assessed Satisfied, Exempt or Provisional) · Publish enrolment tasks (an enrolment task added on its own while conditions remain unassessed). When all conditions are completed by the applicant but not yet assessed, the button is hidden with the message Complete assessment to issue unconditional offer.
- Unconditional: Publish enrolment tasks (an enrolment task added/re-requested on its own) · Re-issue unconditional offer (other task updates alongside) · hidden (nothing pending).
The action section also shows a status — e.g. Pre-offer tasks published, Conditional offer issued, or, when changes are pending, Edited tasks not published / Edited conditions not issued / Edited offer not issued. When any task is edited, an edit icon appears against the programme in the spreadsheet view, the left navigation, the programme header and the edited task itself.
The panel also shows an applicant summary and the timeline. Secondary actions are Reject (before an offer) or Withdraw offer (after one is issued), plus More actions.
Page contents
The programme's requirements are shown grouped by requirement, with their tasks and the associated applicant data. Requirements are assessed here, staff add them via Add a requirement, and fulfilment can be brought in from another of the applicant's programmes.
Issuing and viewing offers
- Issuing or re-issuing an offer opens the relevant Issue offer screen, which includes editable offer-letter opening and closing text — editing it updates the generated offer letter.
- The View offer button (top-right) always opens the most recently issued offer; the matching timeline entry also links to the offer letter.
The right action is always surfaced in one place for each stage, with clear visibility of what's been published or issued and what's still pending.
Assessing programme requirements
Your team assesses each requirement on a programme to decide whether it's been met, still needs evidence, or doesn't apply. Requirements span four levels; pre-offer, condition, enrolment and staff-only and each requirement is made up of one or more tasks that are assessed independently.
Requirement and task structure
A requirement groups one or more tasks; its label is the section heading on the programme page (e.g. "Proof of identity" or "120 UCAS tariff points or equivalent"). Each task has:
- a task level — Pre-offer task, Condition or Enrolment task — which prefixes the description the applicant sees (e.g. "Enrolment task: Please upload your degree certificate")
- a configurable title and description, editable via the edit icon on hover
- fulfilment data or documents, where the applicant has provided them
Requesting vs assessing
What a task's dropdown offers depends on whether the applicant has supplied fulfilment data:
- No fulfilment data, the dropdown controls the level at which the task is requested. Pre-offer task is only available during the Applied stage; afterwards only Condition, Enrolment task and Exempt are available. A task with no data can't be set to Satisfied or Provisional.
- Fulfilment data present, the dropdown becomes an assessment control with the statuses below.
Assessment statuses
|
Status |
Meaning |
|
Assess |
Default for a task with fulfilment data awaiting review |
|
Satisfied |
The data or document meets the requirement |
|
Provisional |
Accepted on a provisional basis. For an Academic results task, choosing Provisional triggers the Final academic results task |
|
Not satisfied |
Doesn't meet the requirement. Staff are then prompted to either re-request the task (it becomes a task for the applicant to complete again) or withdraw the whole offer |
|
Exempt |
The task doesn't apply; an optional Exempt reason can be recorded |
When a task is marked Satisfied, Provisional, Not satisfied, re-requested or Exempt, an optional internal note prompt appears — these notes are never shared with the applicant. For an exemption, the note is shown as the Exempt reason.
Exempting a whole requirement
Each requirement has a cog menu with an Exempt requirement option. This sets all tasks within that requirement to Exempt and applies an optional internal note as the Exempt reason to each. Task-level exemption is still available through the individual task dropdown.
Academic entry requirements
A programme can carry multiple academic entry requirements. A main one at the top, with secondary ones below. Each contains Academic results, Final academic results, Academic transcript and Academic certificate tasks, assessed independently. By default all are mapped to the applicant's highest study.
- Select studies to assess: the requirement's cog menu lists all the applicant's studies and qualifications. The highest study is selected by default; staff can select one or more, or replace the highest study. Each selected study generates its own set of the four academic tasks, mapped to that study.
- Other qualifications: a toggle (collapsed by default) lists studies from the applicant's education history not currently used in the assessment. Each has an Add to assessment button to bring it (and its tasks) into the assessment.
- Final academic results: triggered when the applicant declared predicted or no results for the study used in the Academic results task and that task is assessed as Provisional. Completing it updates only its own data, leaving the original Academic results data unchanged.
Staff-only requirements
Staff-only requirements are visible only to university and Administrator users, in their own section below Finance. They're hidden from applicants, agents and partners, send no notifications, and don't affect the offer status or the primary action button. They're assessed with the same options as applicant-facing tasks, support file upload, allow an optional internal note, and all actions are recorded in the Activity Log.
Assessment is streamlined across all stages, each task is assessed independently and auditably with internal notes and Activity Log entries, and there's clear visibility of what's provided, outstanding or exempted.
Adding a requirement
Beyond the requirements applied automatically by configuration, your team can add requirements to a programme to suit a specific applicant's circumstances. There are two flows: Add requirement (applicant-facing) and Add staff-only requirement (internal). Added requirements apply only to that programme — they aren't carried over to the applicant's other programmes.
Where to add them
- Add requirement sits below the Finance requirements section and adds applicant-facing tasks.
- Add staff-only requirement sits under the Staff-only requirements section and adds internal tasks.
How it works
- Selecting either entry point opens a search box: "Search requirements or enter a custom name." It lists the library requirement tasks grouped under category headings; typing filters the list.
- From here you either pick a library task or type a custom name.
Adding a library requirement, opens the Add requirement task screen with: a confirmation line ("[Task name] task will be added under the [Category] requirement"), an editable Description (pre-filled, shared with the applicant), a Task type, and Cancel / Save changes. On save, the task appears instantly under its matching category.
Adding a custom requirement, typing a name that doesn't match a library task opens the Add custom requirement task screen with: an editable Task name (shared with the applicant), a required Description (shared with the applicant), a Task type, and Cancel / Save changes. On save, it appears under the Custom requirements section.
Task type
Every added task is given a task type: Pre-offer task, Condition or Enrolment task. It defaults to the earliest type available for the programme's current stage (no offer yet → Pre-offer; conditional → Condition; unconditional → Enrolment) and can be overridden.
Staff-only requirements
Add staff-only requirement uses the same search-and-modal pattern, confirming the task will be added under Staff-only requirements. These tasks are invisible to applicants, excluded from applicant task validation, and never trigger applicant emails.
A task is added only when Save changes is selected — Cancel or close dismisses without adding anything. All additions are captured in the Activity Log.
Issuing offers
Offers are issued and managed from the programme page in the Applicant File. A programme begins in Applied status; from there, your team requests information, issues an offer, or closes the application using the primary action button in the right-hand panel.
In brief:
- Pre-offer tasks can be published to the applicant before an offer is issued, to gather information needed for the decision.
- A conditional offer is issued when one or more requirement tasks are set as conditions.
- An unconditional offer can be issued once all condition tasks are assessed as Satisfied, Exempt or Provisional; enrolment tasks don't block it.
- Enrolment tasks are published to the applicant when the first offer is issued; new or changed ones can also be published on their own.
- A task's level can be changed — pre-offer, condition or enrolment — via the task type dropdown.
- An issued offer can be updated and re-issued whenever its content changes.
- Staff can create a new programme for the applicant — for example a different course or intake.
- Offer letters are generated automatically from institution templates, with editable opening and closing text set at the point of issue.
The right action is always surfaced in one place at each stage. The sections below cover each step in detail.
Publishing pre-offer tasks
Pre-offer tasks are requirement tasks set to the pre-offer level, information or documents requested from the applicant before an offer is issued, so your team can make an informed decision (for example, a portfolio). They're published while the programme is in Applied status.
How pre-offer tasks arise
- Automatically: if a programme has pre-offer tasks configured, they're published to the applicant as soon as the application is submitted — the programme enters Applied status with the tasks already requested.
- Manually: if none are configured, or you want to request more, then while the programme is in Applied status (and before an offer is issued) you can add a new pre-offer task, or set an existing task's level to Pre-offer via the task type dropdown.
Tasks can only be set to pre-offer before an offer is issued.
Publishing the tasks
- When a pre-offer task has been added or re-requested, the primary action button reads Publish pre-offer tasks.
- Select it to open the Publish pre-offer tasks dialog.
- Select Publish tasks to make them available to the applicant.
Only pre-offer tasks are shown at this stage — conditions and enrolment tasks aren't shown until an offer is issued.
After publishing
- The right-hand panel shows Pre-offer tasks published, the programme stays in Applied, and the button returns to Issue conditional offer.
- If pre-offer tasks are edited but not yet re-published, the panel shows Edited tasks not published.
- The request and the applicant's completion are recorded in the timeline and activity log.
Any pre-offer tasks still outstanding or un-assessed when a conditional offer is issued are carried over as conditions.
Conditional offers
Your team issues a conditional offer when one or more of a programme's requirement tasks are set as conditions.
How to issue
- On the programme page, while the programme is in Applied status with at least one condition present, the primary action button reads Issue conditional offer.
- Select it to open the Issue conditional offer screen, where you review the offer before sending.
The screen includes:
- Offer type (in the title)
- editable offer-letter opening text (shown below the salutation, above the course details)
- course details for the selected programme
- editable offer-letter closing text
Editing the opening or closing text updates the generated offer letter.
Enrolment tasks and converting tasks
- If the programme has enrolment tasks, issuing the conditional offer also publishes them to the applicant. They aren't conditions and don't need completing for the offer — they're simply made available alongside it.
- Before issuing, you can change a task's level using the task type dropdown (e.g. a condition into an enrolment task). Any pre-offer or condition tasks left un-assessed when the offer is issued carry over as conditions.
After issuing
The offer becomes visible to the applicant, the programme moves to Conditional, and it shows under the Conditional stage in the spreadsheet view. The View offer button (top-right) always opens the most recently issued offer.
Unconditional offers
Your team issues an unconditional offer once a programme's conditions have been met.
When it can be issued
An unconditional offer can be issued once all condition tasks are assessed as Satisfied, Exempt or Provisional. Enrolment tasks do not block it, they can still be outstanding when the unconditional offer is issued, and are satisfied or exempted later, before the programme reaches Completed.
How to issue
- When all conditions are cleared, the primary action button reads Issue unconditional offer (any pending enrolment-task change is bundled into the issuance).
- Select it to open the Issue unconditional offer screen and review before issuing.
The screen includes the offer type, editable opening text, programme details (course, mode, intake and any scholarships), and editable closing text. Editing the opening or closing text updates the generated offer letter.
After issuing
The programme moves to Unconditional, the applicant can view the offer, and it shows under the Unconditional stage in the spreadsheet view.
The same issue screen and editing process used for conditional offers keeps the workflow consistent, and staff can review every detail before finalising.
Updating and re-issuing an offer
When edits are made to an issued offer's content, your team re-issues it so the applicant always has the most accurate, up-to-date version.
When re-issue becomes available
The option appears once any of these changes are made after an offer has been issued:
- the assessment of any requirement task is updated
- a task description is edited
- a new requirement task is added
- the offer-letter opening or closing text is changed
- programme details (fee, start date, scholarships) are updated
Opening an edit screen without saving changes will not trigger a re-issue.
What happens after edits are saved
- An edit icon appears on the programme header, in the left navigation, in the spreadsheet view, and on the edited task.
- A message above the primary action button shows the programme has unpublished changes.
- The button shows the relevant re-issue or publish action, opening the Issue offer screen (same flow as the initial issue).
- Once published or re-issued, the icon and message clear, the status updates, and the timestamp reflects the most recent issue.
Re-issue scenarios
|
Current status |
Change made |
Button |
Outcome |
|
Conditional |
Conditions still outstanding |
Re-issue conditional offer |
Conditional |
|
Conditional |
All conditions Satisfied / Exempt / Provisional |
Issue unconditional offer |
Unconditional |
|
Unconditional |
Only an enrolment task added or re-requested |
Publish enrolment tasks |
Unconditional |
|
Unconditional |
Other task updates |
Re-issue unconditional offer |
Unconditional |
Publishing new or re-requested enrolment tasks on their own does not re-issue the offer. Staff can edit confidently — changes aren't visible to the applicant until published or re-issued — and every change is auditable.
Creating an alternative offer (new programme)
Your team can create a new programme that differs from the applicant's original application — offering a place for a different intake or an alternative course. This creates a new programme in Applied status, carrying over relevant applicant data but requiring fresh assessments.
Starting a new programme
You can start one in three ways:
- Select Offer new programme in the Programmes section
- Select the + button in the side navigation
- Edit the current programme's details (covered in Edit programme details)
Setting it up
This opens the Create programme screen, where the fields are chosen in sequence — each filtered by the selections above it and enabled only once the field above is set:
- Intake
- Study level (filtered by intake)
- Course (filtered by study level and intake)
- Mode (filtered by course)
- Campus (filtered by mode)
- Entry year (filtered by campus)
Once all selections are made, Start date, End date, Scholarship and Course fee (year 1) populate automatically from the programme's configuration — staff can override any of these before creating it.
Creating it
Selecting Create programme creates it in Applied status, adds it to the Programmes section and side navigation, and opens its programme page for further action.
The new programme keeps relevant applicant data but does not carry over assessments from the original application. This lets you offer alternatives without changing the original application, helping retain applicants by suggesting suitable options.
Rejecting or withdrawing an offer
Your team can reject an application or withdraw an issued offer when it's no longer available to the applicant, with a clear reason recorded. Once rejected or withdrawn, an offer cannot be reinstated, and the decision is tracked.
Reject vs withdraw
The action label depends on the offer's status:
- Reject for programmes in Applied status (before an offer is issued)
- Withdraw for offers in Conditional or Unconditional status (after an offer is issued)
The process is the same; only the button label, the wording, and the resulting status (Rejected or Withdrawn) differ.
How to do it
- Select Reject or Withdraw in the right-hand panel.
- In the confirmation dialog, select a reason from the preset list: entry criteria not met; failed academic assessment; failed credibility assessment; fraudulent application; course closure; course full; unable to offer course to applicant; deadline has passed; or other.
- Optionally add an internal note explaining the decision.
- Choose whether to notify the applicant by email (unticked by default).
After the action
A status box appears at the top of the offer page showing the status (Rejected or Withdrawn), the selected reason, and the internal note if provided. The offer status updates accordingly, and the action is logged.
Importing task fulfilment from another programme
Where an applicant has more than one programme, your team can copy requirement task fulfilment from one of their other programmes onto the current one instead of downloading and re-uploading the same documents or re-entering the same data. It's most useful for deferrals and when issuing a new programme for the same applicant.
Where to start an import
Two entry points, both opening the same dialog:
- Alert banner when another programme carries fulfilment that could be imported, an "Another programme has fulfilment data" alert appears at the top of the Requirements list, with an Import from other programme button.
- More actions menu the Import from other programme option is also in the programme's More actions dropdown, and stays available even after the banner is dismissed.
How it works
- Open the Import from other programme dialog.
- Select the source programme to import from (the dropdown lists only the applicant's other programmes with compatible, already-fulfilled tasks).
- In the task fulfilment to import checklist (all pre-selected), untick any tasks you want to leave out.
- Select Import data.
What gets imported
For each selected task, fulfilment is copied according to how the task is satisfied:
- Document tasks the uploaded files are copied across.
- Document + data tasks (e.g. passport) both files and data fields are copied.
- Data-only tasks (e.g. referee details) the data fields are copied.
Imported tasks are marked as fulfilled on the current programme, with a confirmation message.
How imported tasks appear
- A "new" indicator (blue dot) appears next to the task title.
- A collapsible Previous section is added, showing the prior fulfilment with the status Replaced by import, so reviewers can still see what was there before.
- Imported fulfilment is then assessed in the normal way.
Eligibility and audit
A task can be imported when it exists on both programmes as the same requirement, is already fulfilled on the source programme, and both programmes belong to the same applicant. Every import is recorded in the timeline (one entry per import action) and the activity log (one entry per imported task, capturing who, when, and the source programme).
Dismissing the banner hides it for that programme but doesn't turn the feature off. Nothing is imported until Import data is selected, and any prior fulfilment is preserved under Previous.
How offer letters are generated
Offer letters in Apply are generated automatically when an offer is issued, producing consistent, professional letters that reflect your university's formatting and wording.
How the right letter is chosen
The system automatically selects the correct letter based on the offer type and the applicant's fee status, giving four combinations:
|
Offer type |
Fee status |
Letter used |
|
Conditional |
Home |
Conditional (Home) |
|
Conditional |
Overseas |
Conditional (Overseas) |
|
Unconditional |
Home |
Unconditional (Home) |
|
Unconditional |
Overseas |
Unconditional (Overseas) |
How applicant data appears in the letter
Each letter is built from your institution's branded template, with the applicant's and offer's details inserted automatically at the point of generation — including:
- Applicant details: name, address, and student number (where assigned)
- Course details: course name, awarding body, entry point, duration, mode of attendance, qualification level, start date
- Financial details: course fee (and total fee where applicable), and any scholarships linked to the offer
- Offer content: the editable opening and closing text, and the offer's conditions
The opening and closing text can be edited at the point of issue (on the Issue offer screen), and those edits flow straight into the generated letter.
Letters are produced automatically and consistently, personalised with the applicant and offer data, and always use the correct template for the offer type and fee status reducing manual document handling and errors.
To confirm before publishing: offer-letter templates are set up and maintained by Enroly as part of onboarding and configuration (see the note below). This article describes generation from the university-staff point of view; whether university staff edit templates themselves, or request changes through Enroly, should be confirmed and reflected here.
Editing offer letter templates
A note on this topic. Setting up and editing the underlying offer-letter templates (their fixed wording, layout, formatting logic and the data fields they pull in) is handled by Enroly as part of onboarding and ongoing configuration, using Enroly's document-generation tooling. It is not a self-service task university staff perform in Apply, and it involves internal tooling and processes.
- The fixed content and formatting of your offer letters (standard paragraphs, layout, branding) can be changed — raise the request with your Enroly contact and the template will be updated for you.
- The dynamic, per-applicant content (name, course, fees, conditions, and so on) is inserted automatically from the offer record and doesn't need managing in the template.
- The opening and closing text of an individual offer is the part university staff edit themselves, at the point of issuing the offer (covered in Issuing offers).
Editing programme details and awarding scholarships
Your team can edit the programme details on an individual offer, and award or remove scholarships at any stage. All updates flow through to the offer letter and are recorded in the activity log.
Viewing programme details
Selecting Details expands a panel showing: Course, Mode, Entry level, Start date, End date, Course fee (Year 1), and Scholarship. These are pre-populated from your university's configuration.
Editing programme details
- Select Edit to open the programme details screen.
- The current intake and programme are pre-selected; you can edit the entry year, start date, end date, course fee (Year 1) and scholarship.
- Select Update programme to save.
Saving overrides the previous values and updates both the programme details and the offer letter.
Selecting a different programme or intake doesn't just edit the current offer it starts the Create new programme flow and issues a new offer (covered in Creating an alternative offer). The action button changes to reflect this.
Awarding a scholarship
Scholarships are drawn from your university's configuration (each with a title and amount) and can be awarded at any stage, via either the Edit programme screen or the Issue offer screen.
- Open the scholarship dropdown (defaults to None; lists all available scholarships, or is empty if none are configured).
- Select one or more scholarships.
- Save.
Awarded scholarships then appear in: the offer opening text (a sentence listing them; omitted if none), the programme details panel, and the offer letter (shown as amount + title).
Removing a scholarship
In the Edit programme screen, select the ✕ next to a scholarship to remove it — it's cleared from the opening text, programme details and offer letter. If none remain, the dropdown returns to None.
Every change is recorded in the activity log, and scholarships and details update dynamically in the offer letter — letting your team tailor offers per applicant with a clear audit trail.
Reviewing documents provided by applicants
When an applicant uploads a document or provides information in response to a condition, Apply automatically flags it for review, so your team can respond promptly and keep decisions moving.
What happens when an applicant responds
When an applicant submits evidence against a requirement set as a Condition:
- The requirement's status automatically changes to Assess.
- The original condition text stays visible below the requirement for context.
- The newly submitted document appears alongside the requirement, named the same way as documents from the application form.
Visual indicators
To make sure nothing is missed:
- A "New" badge appears next to any newly uploaded document.
- A "New document" icon appears next to Programmes in the left navigation and at the top of the offer page.
- These let your team spot updates at a glance.
Clearing the indicators
- Once you update the requirement's status from Assess to any other status (e.g. Satisfied, Exempt), the "New" badge is automatically removed from that requirement. (If you set it back to Condition, the submitted document stays visible below the requirement.)
- Once all "New" badges are cleared, the "New document" icon is removed from the left navigation and the top of the offer page.
Your team is notified the moment an applicant responds to a condition, clear indicators help prioritise what needs attention, the original condition text is preserved for reference, and indicators clear once reviewed — keeping the interface focused on what's genuinely new.